How to change a wheel
The most troublesome step in changing a wheel, or removing a wheel to fix a tire, is keeping tabs on the nuts and washers and the order in which they are arranged. Study the arrangement on your bicycle—sketching it on paper, if necessary—before you begin disassembly. If you must remove hub fasteners, place the parts in a container to prevent loss. On bikes with cable-operated brakes, it may be necessary to loosen the cable anchor bolt in order to open the calipers far enough to clear the tire. You must then readjust the brakes.
The formidable-looking 10-speed, or derailleur, rear wheel is usually easy to change. Many manufacturers now install quick release levers (see below). In addition, the guide mechanisms on derailleurs automatically adjust chain tension.
Quick release mechanism
When engaged, the lever must always stand parallel to the frame and point to rear so that it cannot snag spokes or passing objects.
To release, pull lever out and away, never rotate it. To engage, push it in toward wheel.
To set tension, turn adjuster knob, with lever released. A lever with the proper tension requires three fingers to release and firm palm pressure to engage.
-- --
-- -- --

--- Front wheel
Loosen both right and left axle nuts, removing them only it the bicycle has tender braces. Then, slide wheel downward until axle clears slots in fork. To remount, slide axle into slots and replace the tender braces, if any. Tighten both nuts with your fingers. Center the wheel in the fork, then firmly tighten both nuts with a wrench.

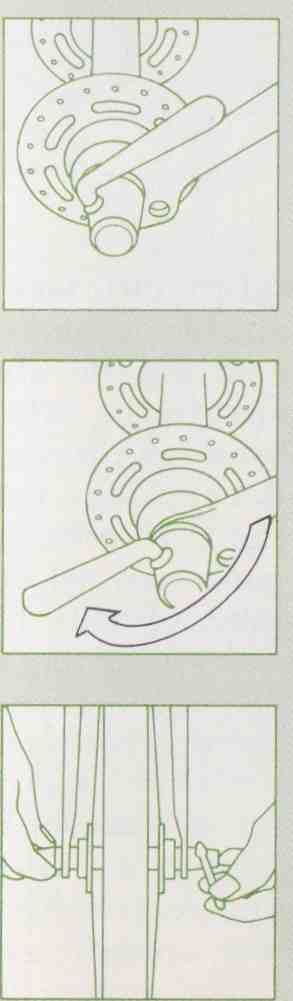
--- Three-speed rear wheel
Turn bike upside down. Disconnect adjuster nut. Loosen left side nut and tunnel nut. Push away tender braces and lift axle from its slots. Free chain from sprocket. To remount, loop chain on sprocket and slide axle into slots. Pull the wheel back until chain has 1/2-in, play; finger-tighten nut on left. Center wheel, tighten nuts, connect adjuster.

--- Single-speed rear wheel
Remove brake-arm Clip, nut and bolt Loosen axle nuts (remove them only if bicycle has fender braces) and slide wheel from axle slots. To remount, loop chain over sprocket and slide wheel into slots. Pull wheel back until chain has / play, then tighten right nut. Center wheel in frame and firmly tighten both nuts, Replace the brake-arm clip.
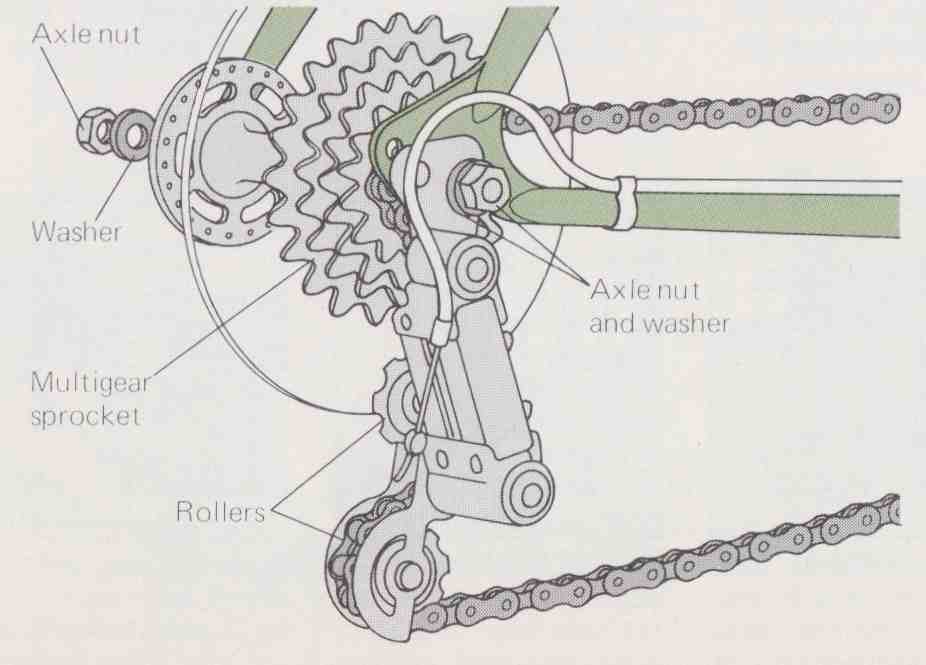
---Derailleur rear wheel
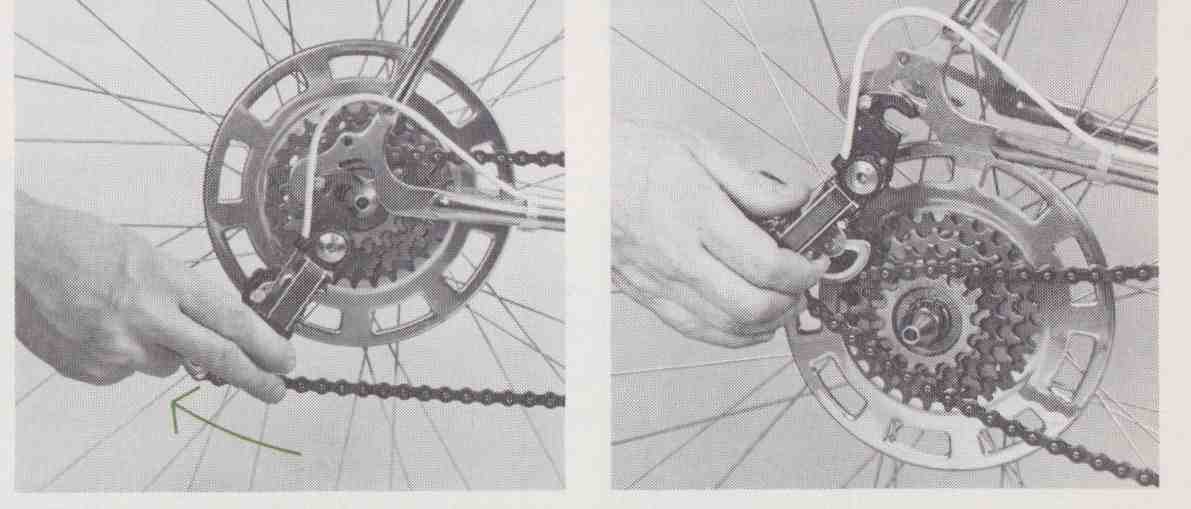
---To remove, shift to highest gear while turning pedal and whee. Loosen
axle nuts or open quick release mechanism. Swing derailleur up into its open
position and push wheel forward until it clears chain.
---To remount, lay chain on smallest sprocket. Pull derailleur to Open position and slide wheel into place. Center wheel in frame and tighten axle nuts or engage quick release mechanism. Chain adjusts itself.
Fixing a flat tire
To locate the cause of a flat, rotate the wheel slowly and inspect the tire. If you find a cut or puncture, mark it on the tire with chalk. Its position relative to the valve will help you find the leak in the inner tube. Remove nails from the tire with pliers and pry out glass with a screwdriver. If there is no obvious puncture in the tire, test the valve (right). If the valve is OK, remove the inner tube to locate the leak.
First, remove the wheel. Unseat the tire with bicycle tire irons, or with spoon handles. Sharp-edged tools such as screwdrivers may cause more punctures in the inner tube.
After removing the tube, check the rubber around the valve. If it is torn or cracked, replace the tube. If air is leaking from under an old patch, replace the tube. Do not patch over it. Patch other kinds of leaks as shown below. Complete patching kits are sold in bicycle shops. Before remounting the tire, inspect it to make sure that no glass or metal fragments remain inside.
Use a good hand or foot pump and a pocket gauge to inflate tires to the pressure listed on the sidewall. Service station gauges are notoriously inaccurate, and the volume of air the pumps give can quickly burst a bicycle tube.
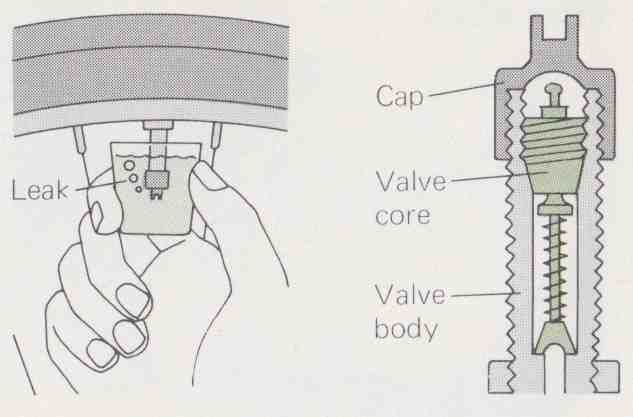
Checking valves: Turn wheel until valve is at the top and
sub merge valve in a small glass of water. Unscrew leaking valve core with
needle-nose pliers, or special slotted valve cap, and replace it.
Unseating the tire, patching the tube

1. If tire is still partially inflated, then deflate it. Unscrew valve-holding nut, if any, and carefully push the valve stem up inside the wheel rim. 2. With a spoon handle, pry a 9-in. section of tire over the rim. Leaving first spoon as a wedge, run a second spoon around entire rim to free tire. 3. With one side of tire clear of rim, carefully work the inner tube out. Check valve stem for damage. If none is found, partially inflate tube.

4. Pinpoint leak by passing the partially inflated tube through the water, stretching it slightly to enlarge any small holes. Look for telltale bubbles. 5. Mark the puncture with chalk. Deflate inner tube and clean the area with emery cloth or sandpaper Apply a light even coat of adhesive and let dry. 6. Peel backing from the patch and press patch, sticky side down, over the puncture. Rub edges of patch firmly with spoon. Inflate after 5 minutes.
Reseating the tube and tire
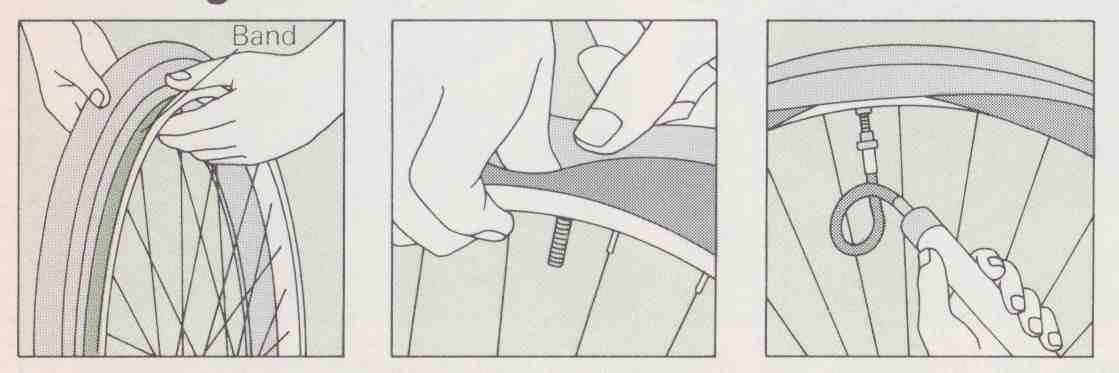
1. Inspect the rim to see that no spoke nipples protrude and that the rim band is smooth and perfectly centered. 2. Pull back the tire's free edge to expose the valve opening. Insert valve stem and draw tire back over that section of tube. 3. Inflate the inner tube until it just begins to take shape. Overinflation will make the next steps more difficult.

4. With your thumbs, tuck tube under tire and onto rim. Then, begin to press the tire's free edge inside the rim lip. 5. When about 9 in. of free edge remain outside the rim, use your fingers to work this final section tightly into place. 6. Check that both tire edges are properly seated. Replace valve-holding nut, if any, and inflate tire to correct pressure.
Servicing wheel bearings

Bearing wear is caused by dirt, lack of grease, or overtightening of the cones. It can be detected by removing the wheel and spinning it as you hold the axle. If you feel grating or vibrations, disassemble the bearings and check for worn parts, as shown at right. If even one bearing shows wear, get a new set with the same size and number of balls. Play or binding is eliminated by adjusting the cones. Grease the bearings twice a year.
Most bikes have one adjustable cone (it has notches br the wrench) and one fixed cone (no notches). If a wheel has two adjustable cones, leas e one on the axle during cleaning and reassembly. If it is worn, wait until the opposite cone is properly adjusted, then replace and adjust this cone.

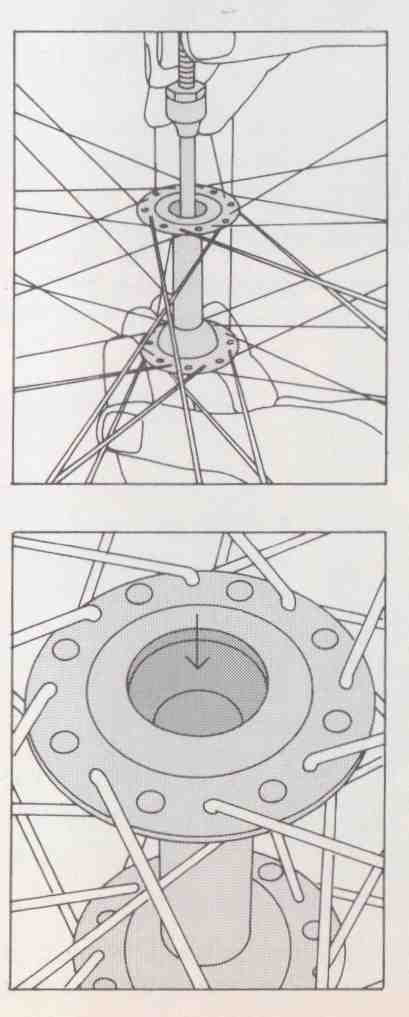
1. Remove wheel and place the axle into a vise, fixed cone downward. (Line jaws of vise with wood to protect the axle threads.) Hold cone with a thin wrench and loosen locknut, then remove cone.
2. Open vise. Remove wheel and invert it. Catch bearings and count them. If any are worn, replace the entire set. If they are reusable, store them in a container.
3. Lift axle out of hub, invert wheel, and spill out the other set of bearings. If they can be reused, store them in a second container.
4. Clean the cups at either end of the hub (arrow) with kerosene and inspect. If cups are worn replace the wheel (which is less expensive than fitting the old spokes and rim to a new hub).
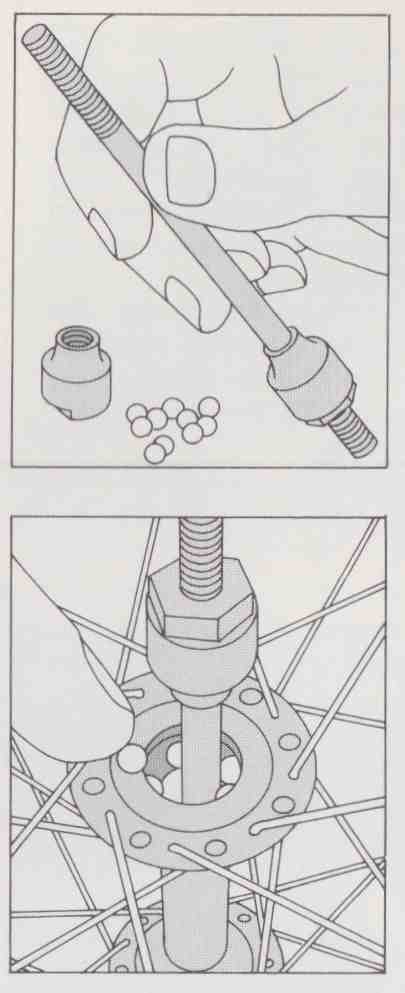
5. Clean the cones and axle in kerosene. If the cones show any wear, replace them. The cones and axle are usually sold as a set. Clean the bearings in separate containers. Replace the set if any bearings are worn.
6. Half fill both cups with bicycle grease. Loosely fit the axle and replace bearings on this side, being sure to put back the same number you removed.
7. Hold the axle tightly in place so that the bearings cannot fall out and Invert the wheel. Put axle in vise and replace the remaining bearings and adjustable cone.
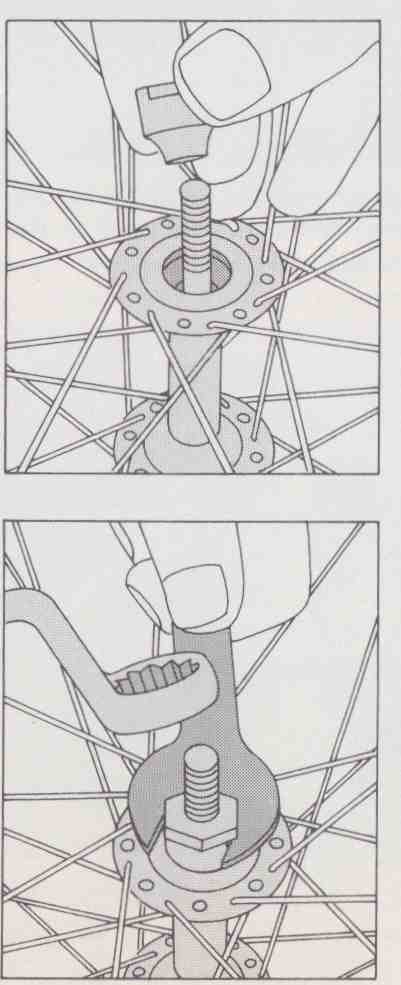
8. Tighten the cone until the wheel can be spun without any side-to-side play. If wheel binds, loosen the cone. Hold cone with a thin wrench and tighten the locknut, then recheck adjustment.
Replacing a spoke

Bicycle spokes look fragile, but they withstand tremendous pressures in keeping the wheel true. To be true, the wheel must be perfectly round, while its plane of rotation is constantly perpendicular to the axle. A single damaged or improperly tensioned spoke can throw the wheel off and lead to a wobbly ride and erratic braking.
A wheel obviously out of true, or one with several damaged spokes, should be brought to a qualified repairman, but you can safely replace one or two spokes yourself, as shown below. It is important to properly lace the replacement into the existing pattern (right). Study the arrangement of the spokes closely before beginning any work. You may have to remove the freewheel sprocket.

1. With wheel dismounted and tire off, remove bro ken spoke. Note the side of the hub to which its head connects. Thread the new spoke through hub.
2. When head is properly seated, swing the spoke up and lace it into the network, ending with the tip of the spoke near its hole in the rim.
3. Engage tip of spoke to the nipple on the rim; tighten until the spoke appears taut and straight and the nipple is flush with the rim surface.
4. Adjust with a spoke wrench until new spoke has same give as intact spokes. It must not protrude through nipple or may puncture tube.
Emergency spoke replacement

1. Repairs can be made on the road it you carry a wrench with a ½-in. hole drilled n the handle and re placement spokes about 1 in. longer than those already on the wheel.
2. Leave tire and wheel on bike. Begin repair by cutting oft head of new spoke. Then, use the hole in the wrench to bend the spoke’s non-threaded end as shown
3. Hook bent end into hole in hub. Lace spoke into network, then flex it to insert into nipple. Adjust spoke tension. This repair should be regarded as only temporary.