If the saddle’s height and angle are adjusted and the position of the brake levers on the handlebar is set so that they are within easy reach, then riding will be more efficient and comfortable. A novice cyclist should try setting the saddle height a little lower at first, and work toward the ideal once he or she is used to riding.
- Allen key multi-tool
- Wrenches
- Screwdriver
Adjusting your riding position
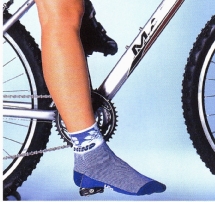
(1) Remove
your shoes and sit on your bike, supporting yourself against
a wall.
- Set your crankarms so that the pedal farthest from the wall is at the low point of its revolution.
- Put the heel of your foot on the pedal. Your leg should be straight when you do this. Ask someone to help you check.
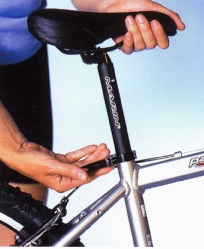
(2) Raise
the saddle if your leg is not straight when your heel is on
the pedal. Lower the saddle if your heel does not reach the pedal.
- Undo the seat pin clamp bolt. Raise or lower the saddle, tighten up the bolt, and try again. Ask your helper to see if your leg is straight. Do not lean on the foot that you are testing.
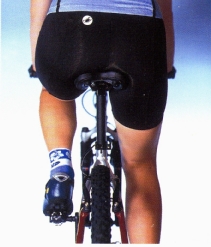
(3) To make absolutely sure the saddle height is right
for you, go for a ride with your cycling shoes on and your feet in their
normal position on the pedals.
- Ask your helper to ride behind you and make sure your hips are not rocking from side to side as you ride. If they are, the saddle is set too high and you need to repeat Steps 1 and 2.
 (4) Place the widest part of your foot over the pedal
axle. If your shoes have cleats, set them up so that your foot can easily
adopt this position.
(4) Place the widest part of your foot over the pedal
axle. If your shoes have cleats, set them up so that your foot can easily
adopt this position.
- Set your crankarms parallel to the floor. The depression on the side of your leading leg, just behind the kneecap, should be directly over the axle of the pedal. Ask your helper to check.
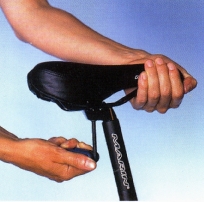 (5) Move your saddle back if the depression on your
leg is in front of the axle. If it is behind, move it forward.
(5) Move your saddle back if the depression on your
leg is in front of the axle. If it is behind, move it forward.
- Undo the saddle clamp under the saddle. On modern bikes, you will need an Allen key; on older bikes, use a wrench.
- Repeat Steps 4 and 5 until you are sure you have the position right.
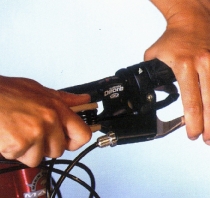 (6) Adjust the reach of the brake levers if you have
small hands and short fingers.
(6) Adjust the reach of the brake levers if you have
small hands and short fingers.
- Undo the brakes and screw in the adjuster on each brake lever until you can reach the lever easily. Then reset the brakes.
- Set the brake levers at an angle to the handlebar so that you can pull them in line with your arm.
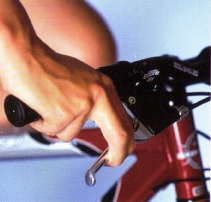 (7) Make sure that the brake reach allows you to apply
the brakes using the first joints of your first two fingers, while holding
the handlebar securely with your thumb and remaining fingers. You should
be able to hook your fingers over the brake levers. If you have to stretch
too far, you will be unable to apply enough power.
(7) Make sure that the brake reach allows you to apply
the brakes using the first joints of your first two fingers, while holding
the handlebar securely with your thumb and remaining fingers. You should
be able to hook your fingers over the brake levers. If you have to stretch
too far, you will be unable to apply enough power.