This section covers the skills necessary to become a competent cyclist-basic skills that are important for performance and safety. You will learn proper pedaling, gear shifting, and braking techniques as well as how to position your body for efficiency and comfort and how to handle your bicycle in a variety of situations.
Racing-specific skills are covered in Section 8.
POSTURE/POSITION
Your upper body position on the bicycle should be based on comfort and aerodynamics. Most riders find it comfortable to keep their hands on the top of the handlebars or the hoods. This results in an upright posture that creates a great deal of wind resistance, which is OK when aerodynamics are not important, such as drafting, climbing, or on easy rides with no training objectives. When riding in the draft of other cyclists, keep your hands on the hoods and not on the top bar so they remain near the brake levers.
When riding unsheltered and when time matters, you should move your hands to the drops for improved aerodynamics. Aero bars are used in time trials to put the rider in an optimal aero dynamic position. Aero bars are designed specifically for time trials; you should not go into the aero position when drafting or are otherwise in close proximity to other riders because the bars position your hands too far from the brake levers for quick braking response.

----------- These three photos demonstrate how the rider reduces his frontal
surface exposed to the wind when he goes from riding upright, to riding into
the drops (top right), and by using aero bars (bottom).
Aerodynamics
To appreciate how position affects aerodynamics and performance, try the following experiment when the wind is blowing between 10 and 15 mph.
Sitting as tall in the saddle as you can, ride directly into the wind for 5 to 10 minutes. Pay attention to your speed and your heart rate, using a Cycling computer and a heart-rate monitor, and to your perceived effort. Then get as low as possible into the drops and ride for another 5 to 10 minutes, keeping your heart rate and perceived effort the same.
You will notice a significant increase in speed.
Much research has been done on the aerodynamics of Cycling, and professional cyclists spend a lot of time in wind tunnels looking to improve performance. Cyclists can reduce their time-trial times by minutes by using aero equipment and riding with aero bars in an aerodynamic position.
Turbulence (or drag) is generated as air travels over the surface of an object. Turbulence creates an area of low pressure behind the object and an area of high pressure in front of it. Air moves from an area of high pressure to an area of low pressure, creating force against the leading edge.
The faster an object moves, the greater the drag, and its effect are much greater on a cyclist traveling at 25 mph than on one traveling at 15 mph.
There are two main types of drag in effect during Cycling. The first is surface drag. The rougher a surface and the larger the surface area, the greater the turbulence. Cycling jerseys and shorts are therefore made mostly of smooth materials and fit the body tightly. Time-trial riders wear special "skin suits," which are cut to fit without wrinkles or gaps when the rider is in an aero posture. Some companies use dimpled material on the arms of jerseys to improve aerodynamics.
The dimples cause a specific type of turbulence that causes the boundary layer to "stick" closer to the arm and reduce the turbulence at the trailing edge.
Form drag deals with the shape of an object. A traditional round frame tube creates a large amount of turbulence at its trailing edge, whereas on an aerodynamic frame air flows more smoothly around the foil-shaped or bladed tubing (see illustration next page). This reduces the pressure differential between the leading and trailing edges, so the cyclist expends less energy overcoming turbulence.
Cyclists talk a lot about aerodynamic equipment, but the surface area of the rider is much greater than that of the bicycle. The cyclist's body accounts for 70 to 80 percent of the total drag of the bicycle and rider. Aero bars are used in time trials to reduce the frontal surface area of riders by making them adopt a streamlined posture, with the torso nearly horizontal and the arms pulled close together in the front. Moving from an upright position to an aero position with the use of aero bars de creases a rider's workload by about 9 to 10 percent.
When riding a road bicycle without aero bars, you can reduce the frontal surface area by getting into the drops and assuming a low posture. Moving from an upright position with your hands on the hoods to a lower position with your hands on the drops will decrease your workload by about 5 to 6 percent.
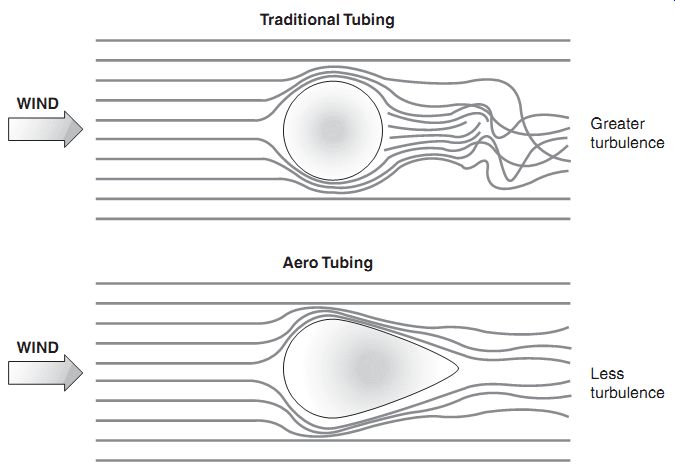
---------- Air flows more smoothly over aerodynamic frame tubes, which
produce less turbulence than traditional round frame tubes.

---------- If the pedal stroke is pictured as a clock, the right leg applies
its greatest power when it's pushing almost straight down (between two o'clock
and four o'clock) and the least power when it's pulling up and forward (between
nine o'clock and twelve o'clock).
PEDALING
Now that you're positioned on the bicycle, let's start pedaling. It's not as simple as just pushing the pedals, however. Proper pedaling mechanics, cadence, and gear selection all affect efficiency and performance.
Pedaling Mechanics
Coaches and cyclists often advise riders to "pedal in perfect circles." What does that mean? Cranksets are concentric within the bottom bracket, and crank arms don’t change length, so the pedals always travel in a perfect circle. I prefer to tell cyclists to work on "pedaling smoothly," which more accurately describes the ideal pedal stroke.
Pedaling smoothly is neither easy nor intuitive because the direction in which you apply force to the pedal changes throughout the stroke.
From the twelve o'clock position to about the three o'clock position, force is applied down and forward by the right leg. From three o'clock to six o'clock, it is down and back. From six o'clock to about nine o'clock, the force is up and back, and from nine o'clock to twelve o'clock, it is up and forward. Due to the muscles involved, the angles of the joints, and a little help from gravity, more force is applied between the two o'clock and four o'clock positions than anywhere else in the stroke. The least amount of force is applied be tween nine o'clock and twelve o'clock. The total amount of applied force varies through the rotation of the crank.
Both legs must work together. As one leg pushes down, the opposite leg lifts. By pulling up between the six o'clock and twelve o'clock positions, you are not adding a noticeable amount of force, but you are decreasing the weight that the opposite leg must lift during its downstroke.
This may seem awkward at first. Your legs will oppose each other and your pedaling will be jerky and inefficient. With training, though, neuromuscular adaptations occur that will enable the leg muscles to fire in proper sequence. Your pedaling will become better synchronized, and your economy will greatly increase.
The best way to assess your pedaling economy is to ride on a set of trainers or rollers. If you are not pedaling smoothly, you will feel and hear the flywheel speed up with every downstroke. If you are pedaling smoothly, the flywheel will roll smoothly, with no noticeable lunges.
Cadence
The number of revolutions your pedals make in one minute is cadence. It is important to keep your cadence between 90 and 100 rpm. There are some exceptions to this rule (explained later). A cadence of 90 to 100 rpm is far faster than most non-serious riders use, but it pays off in economy of energy expenditure. Assuming that you maintain the same speed over the ground, a lower cadence (70 to 80 rpm, for example) means that you are using a larger gear combination and putting more force into each pedal stroke. This requires the use of more intermediate- and fast-twitch muscle fibers, both of which produce more force but fatigue much more quickly than the slow-twitch fibers, which do more of the work at higher cadences. The trade-off needed to maintain the higher cadence is an increased aerobic requirement. (See Section 10 for details on muscle physiology.) When the muscles in your legs contract, they push the blood through the veins and back toward the heart, helping the heart overcome gravity. It is theorized that at high cadences, more blood is pushed to the heart, which may result in an increase in stroke volume-the amount of blood expelled from the heart and sent out through the body on each beat-thus supplying more oxygen-rich blood for increased aerobic performance.
Because of the increased aerobic requirements associated with higher cadence, it may feel as though you are working harder. It will take about two weeks of riding for your body to adapt.
Once you adapt, you will become more comfort able and will be riding more economically, which will translate into improved performance.
The exceptions mentioned earlier deal with time trials, sprints, and climbing. To be competitive in a time trial, it is necessary to produce maximum sustainable power. The best way to do this is by in creasing cadence to around or above 100 rpm, not by selecting a higher gear ratio. Sprinting during attacks (a swift acceleration designed to separate a rider from the pack), responding to attacks, and sprinting for the finish line follow the same basic principle.
Climbing requires a different approach. On long climbs, good riders tend to drop their cadence to around 70 rpm. Maintaining a high cadence while climbing may tax the aerobic system too much and require dropping to a lower cadence. Climbing cadence will vary with the rider. The heavier the rider, the greater the power required to overcome gravity and climb at a given speed. The greater the cyclists' aerobic capacity, the higher their cadence may be.
Those with lower cadences will be pushing larger gears to keep the same pace, and in most cases they will fatigue much faster.
Monitoring cadence will help improve your performance. If you are having trouble maintaining a certain speed at your desired cadence on flat terrain, change the gear ratio, as described in the next section.
In the past, cyclists had to count revolutions per minute to monitor cadence. Now, Cycling computers with a cadence function are available for less than $40-well worth it if you care about performance.
Gear Selection: Cranksets and Cassettes
Cranksets and rear cassettes are designated by their number of teeth. A 53/39 crankset has chain rings with 53 and 39 teeth each. An 11-21 cassette has 11 teeth on its smallest cog and 21 on its largest. Gear combinations are expressed as the product of the two-53 × 11, for example.
The larger the chainring, the farther you go per pedal stroke and the harder it is to pedal. It's the opposite on the rear cassette; the larger the cog on the cassette, the shorter the distance you travel per stroke and the easier it is to pedal. A 53 × 11 combination therefore produces the fastest speed per pedal revolution, but it also requires the largest power output. A 39 × 21 combination is easy to pedal, but slower.

--------- Gear combinations are determined by the number of teeth on the
chainring and the number of teeth on the cassette.
Gear development describes the distance the bicycle travels as a function of gear ratio and wheel size. The bicycle's speed, therefore, is a function of gear development and cadence. The formulas for deter mining gear development and speed are as follows:
Step 1.
Gear development (in.) = (chainring ÷ cog) x wheel size (in.) x 3.14 Step 2.
Gear development (ft.) = gear development (in.) ÷ 12
Step 3.
Speed (mph) = gear development (ft.) x rpm × 0.0114
Example:
Scenario: Gear ratio of 53 × 11, cadence of 90 rpm
Step 1.
Gear development (in.) = (53 ÷ 11) × 26.5 × 3.14 = 400.92 in.
Step 2.
Gear development (ft.) = 400.92 ÷ 12 = 33.41 ft.
Step 3.
Speed = 33.41 × 90 × 0.0114 = 34.28 mph
The table on the next page shows the speed obtained using different gear ratios while pedaling at 90 rpm. Here's how to determine the chainring and cassette combinations that best suit your needs:
1. Find the number of teeth on the chainrings and rear-cassette cogs you are using or thinking of buying. The number is usually stamped on them. If you can't locate the numbers, just count the teeth. Mark the first tooth with a marker so you know where you started.
2. Photocopy the table and highlight the appropriate chainrings and cassette cogs, along with the corresponding speeds. This will allow you to compare gear ratios between the various combinations.
3. Create your own table using the formulas above to accommodate different cadences, wheel diameters, or chainring and cassette cog sizes.

SPEED AS A FUNCTION OF GEAR COMBINATION (Speed in miles per hour. Based
on a 700C wheel and a cadence of 90 rpm.) -- REAR CASSETTE COG
The exact method of shifting is determined by the type of shift levers on your bicycle. The differences between each company's shift levers are discussed in Section 2. Through practice you will develop a feel for your specific type of lever. How ever, the concepts of shifting remain the same regardless of the shift system you use.
Never shift unless pedaling; it puts your chain and derailleur in a bind that could damage the drivetrain when you apply pressure to the pedals.
This is especially true if you shift over more than one cog at a time.
Avoid cross chaining when choosing a gear combination. Cross chaining occurs when you're in the large ring in the front and the larger cogs in the back, and when you're in the small ring in the front and the smaller cogs in the back. Either way puts too much of an angle on the chain and can lead to damaged or broken links. Gear combinations to avoid, due to cross chaining, are shown in parentheses in the table.
By selecting gear combinations appropriately, it is possible to produce the same speed on either the large or small chainring. For example, at 90 rpm a 39 × 14 combination will produce a speed of 19.82 mph, and a 52 × 19 combination will produce a speed of 19.47 mph-in other words, pretty darn close. The combination you decide to use will be dependent on the type of riding you're doing. If you're racing, using the large chainring will make it easier to respond to any accelerations from the group. On a recovery day, you should be in the small chainring. Another consideration is the average speed you intend to maintain. For speeds of 20 mph or greater, use the large chainring; below 20 mph, use the small one.
There will be times when you'll need to shift both front and back gears. Do not shift both simultaneously or the chain may drop off the chainring.
When you begin a climb, you'll want to drop from a difficult gear combination to an easier combination. To avoid losing too much momentum, start by shifting down two or three gears (smaller gears) in the back, then immediately shift from the large to the small chainring. If you shift to the small chainring first, you'll lose momentum as you shift the rear to the appropriate cog.
Once you top the hill and begin to descend, move back to the large chainring. If you move to the large ring in the front without adjusting the back, you may be over-geared and it may be difficult to pedal. To prevent this, shift up one or two cogs (larger cogs) on the back immediately before shifting to the large ring.
Always attempt to anticipate shifting requirements. When traveling into a curve that requires you to slow, shift to easier gears as you enter the curve. Otherwise you may be over-geared as you come out of the curve. If you can pedal through the curve, adjust based on feel. Gear down as you come to a stop as well, so you are not over-geared when you take off.
BRAKING
Braking is not as complicated a topic as pedaling, but it too calls for good technique.
Although the front brake has considerably more stopping power than the rear brake, you do not want to slam on the front brake while going downhill at thirty-five miles per hour. This might fulfill your childhood dream of flying, but you will eventually land on the hard, unforgiving asphalt.
Through practice and "feel," you will learn to feather both brakes with an appropriate amount of force to stop quickly and smoothly.
When braking hard or on a downhill, shift your weight to the back of the bicycle. This comes so naturally that many cyclists shift back without even realizing what they're doing. Not only does this decrease your risk of flying over the handlebars, but also it shifts weight to the rear wheel, giving it more traction and making the rear brake more effective.
No matter how quickly you need to stop, do not lock up the brakes. If the wheels aren't spinning, you have no steering control. Maximum braking effectiveness occurs just before the point of lockup, when the wheels are turning slowly and the tires are still gripping the road surface.
If you change brakes or wheels, you must adjust to a new "feel" when braking. When I built my first time-trial bicycle, I installed single-pivot brakes to save weight. Going down a steep hill during my first ride on the new bicycle, I started braking where I usually did before the stop sign, but the bicycle did not slow down at the rate that I expected.
In spite of panic pressure on the levers, the stop sign came and went before I finally came to a stop in the middle of the intersection. Luckily there was no traffic at that moment. I learned that the single pivot brakes were not as strong as the double-pivot brakes on my road bicycle, so I knew that I had to start braking sooner.
Likewise, braking in wet conditions requires more time and distance than in dry conditions.
Water interferes with the grip of the brake pads on the rims, and traction is reduced between the tires and the road. This makes it harder to lock up the brakes against the wheel, but easier to skid nonetheless.
STEERING

---------- There are three basic methods of steering; leaning the bicycle
through a turn is the most common.
There are three common methods for taking curves and turns. The best method for most wide- and moderate-radius curves involves leaning the bicycle into the curve with the inside pedal up and your weight shifted to the outside pedal.
Keep your center of gravity low to increase your stability. At higher speeds it's advisable to get into the drops to further lower your center of gravity. Keep your head up and focus on your path of travel through the turn. This method of steering does not involve any noticeable turning of the handlebars.
When making sharp or slow turns, rotate the handlebars in the direction you wish to travel, and don’t lean. By keeping your weight centered over the contact points of the tires, you limit the risk of sliding, especially when there is water or debris on the road.
The last method, called counter-steering, is used to change directions quickly-for example, to take a sharp turn at speed or to avoid an obstruction right in front of you. Begin by slightly twitching the handlebar in the direction opposite the one you want to go, but keep your weight centered over the bicycle. Let's say you're making a quick turn to the right. Twitch the bars to the left, and the bicycle will begin moving in that direction. If you do not lean, your body will continue moving straight ahead due to momentum. This will quickly place your body mass to the right of the contact point of the tires on the road, which will cause a quick lean to the right; the result is that the bicycle will travel in the intended direction. Practice this in a safe, traffic-free environment before attempting it at high speeds on the road.
Point of Focus
Have you ever swerved to miss something and ended up riding right at the edge of the road, then had a hard time not drifting into the roadside ditch? By focusing your attention on the ditch, you make it that much harder to avoid.
Your bicycle tends to travel where your vision is focused. The trick is to focus on where you want your bicycle to travel instead of where you do not want it to go. In this case, turn your attention back to the pavement and away from the ditch, and you'll almost certainly recover.
Looking over your shoulder to see what's be hind you involves a lot of head-turning. Many cyclists drift a great deal when checking for overtaking cars, sometimes moving right into their path.
As long as you're aware of that natural drift, you can train yourself to compensate for it. Another method is to look back underneath your arm, which limits the amount of head-turning. Its practicality depends upon your riding position and the length of your arms.
Affixing a mirror to your handlebars helps you keep an eye on the traffic behind you. This is not recommended for racing. Avoid using mirrors that attach to your helmet or glasses; both of these can interfere with your vision.
CORNERING
Cyclists who can’t hold their line while cornering put themselves and others at risk, whereas those who can will make up time on their rivals.
The bicycle's cornering limits are set primarily by the bicycle's geometry and the traction of the tires.
These limits become clear only through practice.
Always keep the outside pedal down while cornering. If the inside pedal is straight down, you risk clipping it on the road, which can lift a wheel and cause a crash. I have hit the ground on more than one occasion while attempting to pedal through a corner. The feeling of the bicycle skipping when the pedal hits the pavement makes your hair stand on end. If this occurs, just do your best to get the bicycle under control.
Through practice and experience, you will learn your and your bicycle's cornering limits. As your confidence grows, you'll be surprised how far you can lean. The greater the speed maintained through a corner, the farther you will need to lean the bicycle.
Keep your center of gravity low by placing your hands in the drops. Always brake before entering a curve. When you brake in a curve, your bicycle will attempt to go straight and you could lose control.
Practice cornering in a grassy field to give your self a good idea of how far you can lean your bicycle over without going down. Keep in mind that traction on grass is less than on asphalt. This drill is de signed for beginners to become accustomed to leaning through a curve. Once you're comfortable with this drill, move to a large parking lot that is free of obstacles and continue to practice cornering. Once you're comfortable in the parking lot, you're ready for the road.

---------- When cornering, it's important to keep the inside pedal up
and to lean through the corner.
There will be times when you'll need to pedal through a curve to maintain contact with the group.
Through trial and error you'll be able to determine at which angles you can pedal and at which ones you can’t. Being able to accelerate through a curve will give you the opportunity to put distance between you and your opponents.
Riding beyond your ability has a tendency to produce two different outcomes, sometimes simultaneously. The first is that your riding will improve; the second is that you will crash. Learn from your mistakes as well as your successes. If you don’t push your limits, you'll never know what you're capable of.
CLIMBING HILLS
Some people love to climb; others do not. The difference is usually based on whether or not they can climb.
Love it or not, climbing is a large part of Cycling, and you should not avoid hills in training just because you do not like them. Train on climbs in order to improve. If you live in an area that doesn't have a lot of hills, find a long one and climb it repeatedly. The alternative is that hills will steal your energy and wreck your enjoyment on rides out side of your area, and you'll drop off the back of the pack in every race.
Those who have difficulty climbing are deficient in cardiovascular fitness, power-to-weight ratio, or both. The first problem area is simple to overcome: ride! The second will take a little more work. Power-to-weight ratio is simply your power output at a given load in watts divided by your weight in kilograms. The higher the number, the better the rider. Power-to-weight ratio is discussed in detail in Section 11.
When climbing, place your hands on the hoods.
This puts your back in a more upright position and your hands will be in the right place when the time comes to stand. Although many coaches recommend that you scoot back on your saddle when climbing, I do not think this is always appropriate.
Your bottom will naturally move to the most efficient position on the saddle, and some riders find optimal power in their normal position.
Climbing out of the saddle demands increased energy, so find your rhythm and stay seated for most of the climb. There are times when it's necessary to stand, however: to initiate or respond to an attack; to alter position in order to relieve aching legs; or when the climb is steep enough to demand it.
When you climb out of the saddle, the bicycle will move back and forth as you pedal. This movement assists you in pedaling and moving the bicycle forward, but keep the movement small. Exaggerating it wastes energy.
When shifting from a seated position to standing while climbing, your revolutions per minute will drop and you'll need to go up one or two gears to maintain speed. A loss in momentum can interfere with your rhythm and cause you to slow down. When you stand, your weight shifts for ward, changing the center of mass and causing a significant negative acceleration. To offset this loss of momentum, shift just before you stand and keep tension on the pedals as you stand.
ROAD CONDITIONS

---------- Learning to climb is a good way to increase your overall performance.
(Barbara Dowd)
One second of inattention to road conditions can be disastrous. When cornering, keep an eye out for potholes, puddles, uneven pavement, gravel, glass, dirt, and sand. When approaching a turn, choose a line that's free of debris. If that's not possible, take the turn slowly and carefully.
Cross railroad tracks at a 90-degree angle so your front wheel doesn't get caught in a groove.
If the tracks don’t cross the road at 90 degrees, slow down on the approach and angle the bicycle accordingly. To prevent a pinch flat or wheel dam age, shift your weight to the back wheel, allowing the front to lightly cross the tracks. Once the front wheel crosses, shift your weight to the front and allow your back wheel to cross.
Rain changes the characteristics of the road surface. Running water can move mud, sand, and other debris onto the road. Lane-marking paint is slippery when wet, and rain can bring oil to the surface of a road. Decrease your speed and don’t lean as far into turns. Assume that any standing water hides a pothole and avoid it.
RIDING IN TRAFFIC
We all grew up hearing " Do not play in the street. It isn't safe" from those who loved us, and "Go play in traffic" from those who didn't. I wish I could say otherwise, but road riding is inherently dangerous, and you need only read the newspaper for a few weeks to find numerous reports of cyclists hit by motor vehicles.
Bikes are like any other road-legal vehicle under the law. Riders have the same rights and generally must follow the same rules. The main difference is that you must stay to the far right, giving other vehicles room to pass on your left.
There are times, however, when you need to move from the right side of the road and interact more directly with traffic. If the lane is too narrow for cars to safely pass you, move to the left and claim your place in the lane to avoid being squeezed off the road. In preparation for a left-hand turn, move into the center of your lane or into the left-turn lane. When approaching a stop sign or a traffic light, move over and take your place in line with other traffic. This makes you more visible to cars and establishes your place in line through the intersection.

-------- Wet roads change how a bicycle handles. It's helpful to become
accustomed to these changes.
Don’t ride alongside cars stopped at an intersection, and be cautious when passing cars parked on the side of the road. Watch for cars that may be leaving a parking place, and assume that any car door may open unexpectedly. Watch also for pedestrians who may step out from between parked cars. Moving slightly toward the center of the lane will reduce all of these dangers.
Many motorists do not realize that bicycles are considered vehicles, and they're unsure how to interact with cyclists. Indicate your intentions clearly. Don’t use the right-turn arm signal that you used when learning how to drive a car; few motorists understand it. Instead, extend your right arm and point right. If you are turning left, extend your left arm and point left. If you are merging with traffic, point to the gap you are moving into while making eye contact with the driver behind you.
Cyclists need to be predictable. When you approach an intersection and are not required to stop, don’t stop. If it's your turn at a four-way stop, proceed. Drivers will know how to respond if you ride decisively when in traffic, don’t hesitate, and move as though you are a vehicle.
RIDING IN A GROUP
A cyclist must be completely comfortable riding alone before attempting to ride in a peloton. If you can’t hold your line on your own, you will endanger yourself and those around you in a group.
Beginners usually lack the skill to ride comfort ably in a group; if you try before you're truly ready, you may hear disparaging remarks from members of a club that you may be thinking of joining. Don’t get discouraged or allow others to ruin your enjoyment. Stay out of the peloton until you're more confident. Ride more, get better, and try again.
For experienced riders, remember what it was like when you began riding. When new cyclists attend a group ride, welcome them and try to turn them into assets for your club. Rather than muttering about the newbies' skill level, take the time to teach them how to ride safely in a group.

----- Learning to ride safely in a group is extremely important. Cyclists
must be confident in their bicycle handling abilities before moving from solo
riding to group riding.

------ RIDE LEVELS FOR A LARGE CLUB
Don’t take beginners on an unfamiliar route, then drop them because they're riding too slowly.
For each ride, designate a sweeper who will stay with the beginners, allow them to set a pace they can maintain, and be on hand to help with any problems. Rotate sweepers so one person doesn't get stuck with the job all the time. If the club is large enough, you'll have to ride sweep only a few times a year, which should not affect your training.
You can also designate "hard" and "easy" rides, which will help new riders find their own level and give them targets for improvement. A large club might have five levels, as shown above.
Smaller clubs may be able to field only two or three levels, but the principle is the same. Lower levels are not only for novices. This method allows experienced riders to choose a ride based on their training goal for that particular day.

-------- When slowing for any reason, always signal the riders behind you
by dropping your arm and pushing your hand back, with the palm facing toward
the rear.

------- When approaching obstacles in the road, it's the lead rider's responsibility
to point them out. The signal should be passed down the line by the other riders.

----- Drafting behind other cyclists can reduce your workload by 30 to 40
percent.
Communication
The key when riding with other cyclists is communication. It is accomplished verbally, through hand signals, or a combination of both. When using verbal communication, make sure you are heard: shout! When signaling, make sure you can be seen. Always repeat signals up and down the line, so everyone receives the message.
Following are widely accepted protocols for common situations. If your club uses different protocols, go with them instead.
__Signal your intentions when approaching a turn. For a left-hand turn, point your left arm to the left. For a right-hand turn, point your right arm to the right.
__If you intend to slow down or stop, yell "slowing" or "braking." You can also signal by dropping your arm and pushing your hand to the rear, with the palm facing backward.
I like yelling better because it allows you to keep both hands on the brakes.
__When you stand to climb or accelerate, your bicycle will decelerate momentarily. If the rider behind you is maintaining a constant speed, the gap between your back wheel and his or hers will close quickly. Also, while you're standing, your bicycle will shift from side to side, possibly endangering someone beside you. Yell "standing" so everyone knows what to expect.
__The lead riders are responsible for pointing at obstacles such as potholes, uneven pavement, or debris on the road. This signal is relayed down the group to the last cyclist in line. If the lead riders swerve around an obstacle without signaling, somewhere down the line a cyclist will hit it.
__When a car is coming up from behind, yell "car back." When a car is coming from ahead, yell "car up." Drafting Riding in the area of low pressure that occurs behind a rider reduces drag, so the workload is reduced 30 to 40 percent compared to riding alone.
For any performance-oriented rider, drafting is an important skill.
For the draft to work, you have to ride 4 to 12 inches behind the wheel of the rider in front of you. This is a potentially precarious situation. You need to pay attention to the wheel in front of you, but not to the exclusion of the road ahead and the riders around you. It is essential to ride smoothly and predictably, holding a steady line and avoiding swerving and frequent speed changes. If you begin to overtake the rider in front of you, don’t apply the brakes. Instead slip into the wind, slow your cadence, or stop pedaling. Making drastic changes in speed creates a yo-yo effect, and you and all the cyclists behind you will have to work harder than necessary.
If you notice riders who can’t hold a line, don’t complain under your breath. They may not realize the problem. Instead, politely explain the problem and offer tips on how to develop the skill.
When riding in a crosswind, the area of low pressure is not directly behind the rider. If the wind is coming from the right, drift to the left of the cyclist in front of you until you feel the wind resistance decrease. If it is coming from the left, do the opposite.