Most modern bikes are equipped with either straight or drop handlebars. A rider must be able to rely totally on the handlebar, so for safety reasons, a handlebar must be replaced at once if scratches, stress marks, or cracks develop on the surface.
Straight handlebar
Tools needed:
- Half-round file
- Emery paper
- Ruler
- Allen key multi-tool
- Hairspray
Owners of road bikes sometimes want to change the handlebar to a different shape, often to suit the proportions of their body or because of their cycling needs. Some cyclists want to replace a drop handlebar with a straight, or flat, bar. Others may want to replace their existing straight bars with riser bars, or vice versa. Riser bars, which are fitted to mountain bikes, are straight in the center, then rise up to become straight where the grips are. They are installed the same way as a straight handlebar.
The steps in this sequence apply to all straight handlebars, whatever the reason for replacing them. However, when replacing a drop handlebar with a straight bar, it will be necessary to swap the brake levers for levers that work with flat or riser bars. Some of these steps will also be useful when fitting new grips, brake levers, gear-shift levers, or bar-ends to an existing handlebar.
Right: Components of a straight handlebar.


Step-by-step guide to Installing a straight handlebar
1. Remove any raised pieces of metal inside the stem clamp with a medium, half-round file (inset). Smooth the area with emery paper.
- Place the straight handlebar into the stem clamp and screw in the clamp bolts. Make sure the bar is centered before tightening it fully. If you are fitting a riser bar, decide what angle of sweep you want before tightening the bolts.
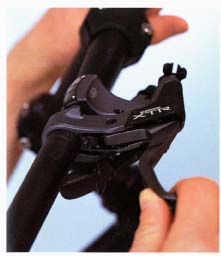
2. Secure the ring clamp of the brake lever to the handlebar. Like road brake levers, off-road levers have a ring clamp that fits over and secures them to the handlebar. Some off-road brake levers have integrated shift levers with only one clamp. However, some are separate and there are two clamps to go over the handlebar.
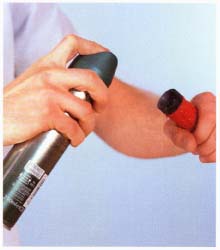
3. Spray hairspray into the handlebar grips to help the grips slide onto the handlebar. When the hairspray dries, the grips will fit tightly to the handlebars.

4. Slide the grips onto the handlebar while they are still wet with hairspray.
- Push the grips farther on if you are fitting bar -- ends to allow for the width of the bar-end clamp.
- Fit grip-locks to hold the grips in place and prevent them from twisting while you are riding.

5. Clamp on the bar-ends . Line them up parallel with the angle of your stem to begin with, then adjust their angle to suit your own preference after riding.
- Put a plastic plug in each end of the handlebar to prevent injury in the event of a fall.